Implementing JWT Authentication in Golang
Implementing JWT Authentication in Golang
Enter JSON Web Tokens (JWT)
In this tutorial, we will walk through how to build a secure GO server using JWT. We will create two routes: a public login route and a protected dashboard route where bouncers will check the pass.
Prerequisites
- Go installed on your machine.
- Basic understanding of HTTP methods like GET, POST.
- Your favourite API testing tool like Postman or cURL.
Step 1: Setting up the Project
First, initialize a new Go module and install required dependencies. We are using gorilla/mux for routing and golang-jwt because reinventing the cryptography wheel is a terrible idea.
go mod init jwt-auth-demogo get github.com/gorilla/muxgo get github.com/golang-jwt/jwt/v5
Step 2: Defining our structure and secret key
Create a main.go file. We need to define a struct to handle our incoming login payloads and set up a secret key.
Security Note: We are hardcoding the secret key here for learning purposes. Do NOT do this in real life. Hardcoding secrets in production is how you end up sipping coffee in a burning room saying, “This is fine.” Always use environment variables!

package main

import (
	"encoding/json"
	"fmt"
	"net/http"
	"strings"
	"time"

	"github.com/golang-jwt/jwt/v5"
	"github.com/gorilla/mux"
)

// Credentials represents the login payload
type Credentials struct {
	Username string `json:"username"`
	Password string `json:"password"`
}

// jwtKey is used to create the signature. Keep it secret, keep it safe.
var jwtKey = []byte("super-secret-production-key")
Step 3: Generating the Token
When a user logs in successfully, we need to hand them a token. Slaps roof of JWT: “This bad boy can fit so many claims in it”

func createToken(username string) (string, error) {
	claims := jwt.MapClaims{
		"username": username,
		"exp":      time.Now().Add(time.Hour * 1).Unix(), // Expires in 1 hour
	}

	token := jwt.NewWithClaims(jwt.SigningMethodHS256, claims)
	return token.SignedString(jwtKey)
}
Step 4: Building the Login Route
Now, let’s create the handler that authenticates the user. If they provide the correct credentials, we give them the token. If they don’t? They get a 401 unauthorized.
func Login(w http.ResponseWriter, r *http.Request) {
	w.Header().Set("Content-Type", "application/json")
	var creds Credentials

	if err := json.NewDecoder(r.Body).Decode(&creds); err != nil {
		http.Error(w, `{"error": "Invalid request payload"}`, http.StatusBadRequest)
		return
	}

	// Hardcoded authentication check (replace with a database in production)
	if creds.Username == "admin" && creds.Password == "secure123" {
		token, err := createToken(creds.Username)
		if err != nil {
			http.Error(w, `{"error": "Error generating token"}`, http.StatusInternalServerError)
			return
		}

		w.WriteHeader(http.StatusOK)
		json.NewEncoder(w).Encode(map[string]string{"token": token})
		return
	}

	http.Error(w, `{"error": "Unauthorized access"}`, http.StatusUnauthorized)
}
Step 5: Verifying the Token
Trust nobody, not even your own tokens. Before letting anybody access our protected routes, we need a function to decode and validate the JWT.
It is a crucial security step here is verifying the token’s signing method. If a malicious user tries to pull a fast one and change the algorithm to “none”, we catch it. Outstanding move.
Note on Security: JWT is signed, not encrypted. This means the header and payload can be decoded and read by anyone who intercepts it. However, the signature prevents tampering—if anyone alters the payload, the signature verification will fail. That's why we must explicitly check that the signing algorithm matches what we expect (HS256).
func validateToken(tokenStr string) error {
	token, err := jwt.Parse(tokenStr, func(t *jwt.Token) (interface{}, error) {
		// Ensure the token's algorithm matches what we expect
		if _, ok := t.Method.(*jwt.SigningMethodHS256); !ok {
			return nil, fmt.Errorf("unexpected signing method")
		}
		return jwtKey, nil
	})

	if err != nil || !token.Valid {
		return fmt.Errorf("invalid token")
	}
	return nil
}
Step 6: Securing the Dashboard Route
With validation in place, we can create our protected handler. It will look for the Authorization header, extract the token (removing the “Bearer” prefix) and pass it to our validation function.
Missing header? Straight to jail. Invalid token? Straight to jail.
func Dashboard(w http.ResponseWriter, r *http.Request) {
	w.Header().Set("Content-Type", "application/json")
	authHeader := r.Header.Get("Authorization")

	if authHeader == "" || !strings.HasPrefix(authHeader, "Bearer ") {
		http.Error(w, `{"error": "Missing or invalid token"}`, http.StatusUnauthorized)
		return
	}

	// Extract the actual token string
	tokenStr := strings.TrimPrefix(authHeader, "Bearer ")
	if err := validateToken(tokenStr); err != nil {
		http.Error(w, `{"error": "Invalid token"}`, http.StatusUnauthorized)
		return
	}

	w.WriteHeader(http.StatusOK)
	json.NewEncoder(w).Encode(map[string]string{"message": "Welcome to the secure dashboard!"})
}
Step 7: Wiring it All Together
Finally, let’s tie everything up in our main function by mapping our routes and starting the server.
func main() {
	r := mux.NewRouter()
	r.HandleFunc("/api/login", Login).Methods("POST")
	r.HandleFunc("/api/dashboard", Dashboard).Methods("GET")
	fmt.Println("Server running on port 8080...")

	if err := http.ListenAndServe(":8080", r); err != nil {
		fmt.Println("Failed to start server:", err)
	}
}
Testing the API
- Run the server:
go run main.go - Get a Token: Send a Post request to
http://localhost:8080/api/loginwith this JSON body:
{
    "username": "admin",
    "password": "secure123"
}- Access the Dashboard: Copy the token from the response. Send a GET request to
http://localhost:8080/api/dashboardand add anAuthorizationheader with the valueBearer <YOUR_TOKEN_HERE>.
If it works, look at your terminal and whisper: “Look at me, I am the authenticated user now”.
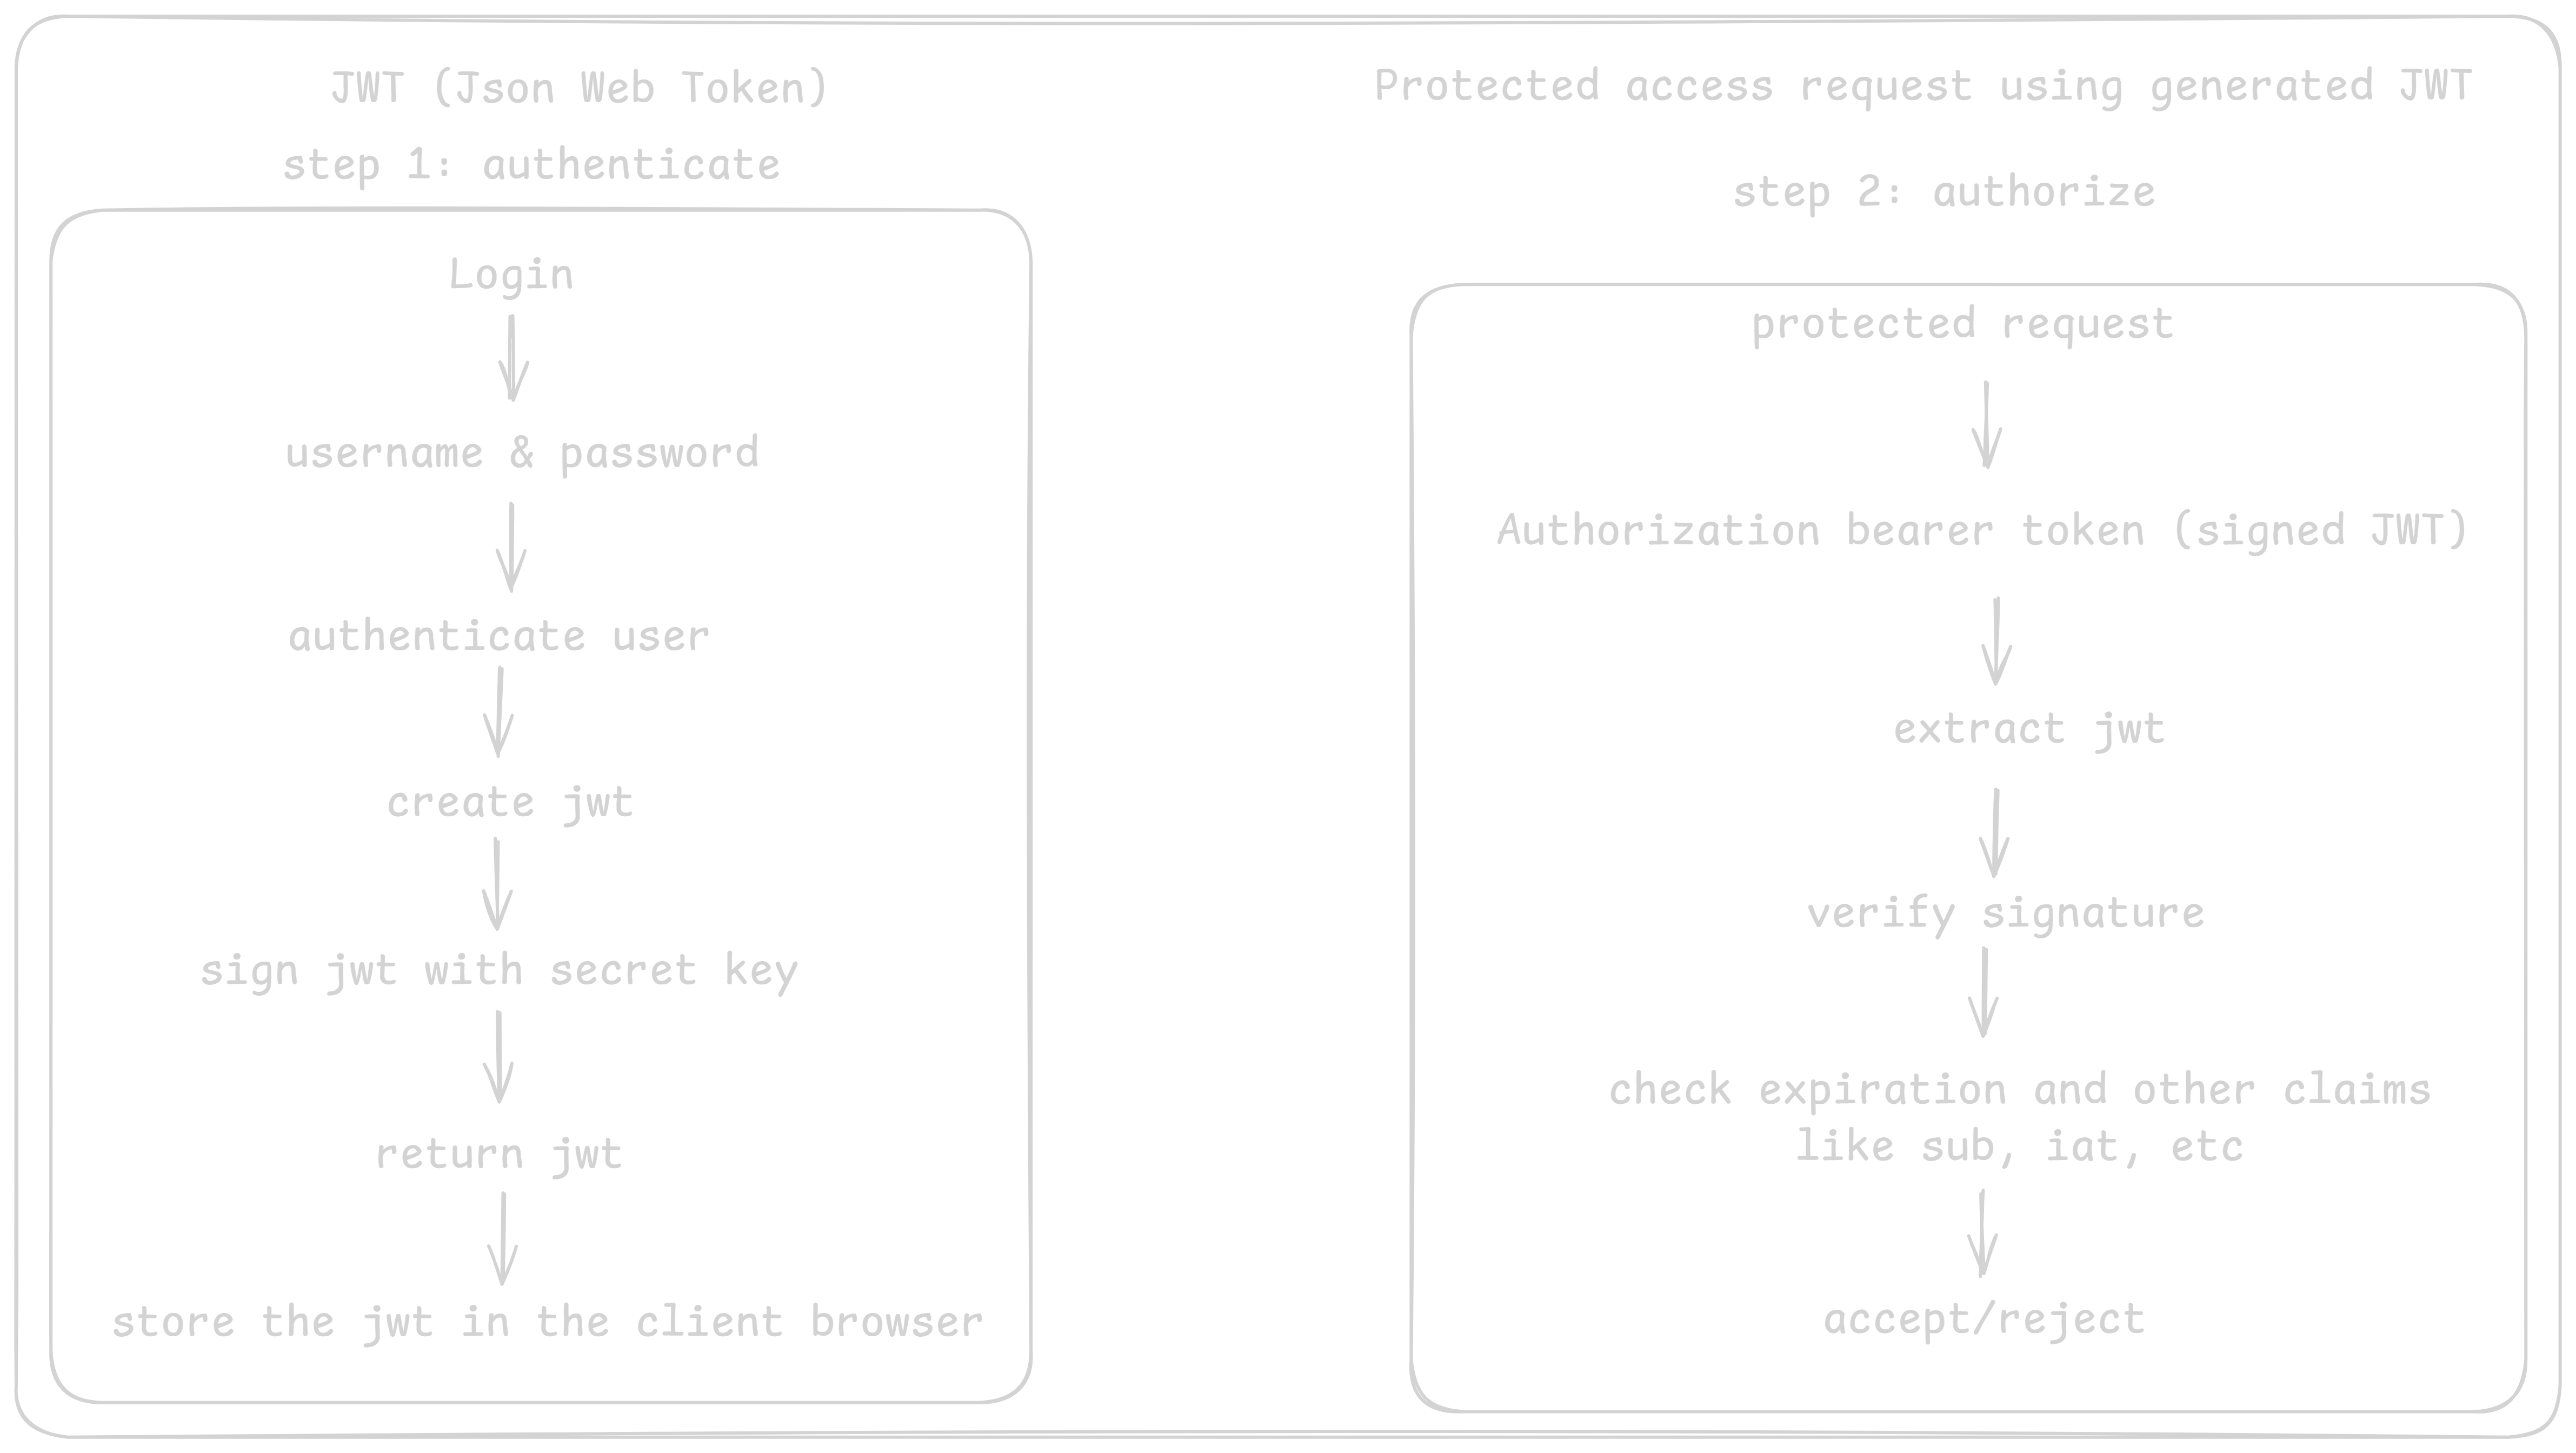
Wire Frame of the entire workflow-
Wrapping Up
It ain’t much, but it’s honest work! You have built a robust, foundational JWT authentication system in GO. While this is a simplified example, the concepts here are the exact same ones used in enterprise applications.
To take this to the next level, try connecting it to a PostgreSQL database or moving your secrets key into a .env file. Happy coding!